
Installation
The following steps are used to install the device using the adhesive tape that is already on the device as shipped. This page also contains information about how to do remove an installed device as well as info completing a fully permanent glued-in install using the cyanoacrylate gel adhesive provided. If you have any problems from the install, please review our FAQ & troubleshooting page to see if that resolves the issue before contacting us.
Included
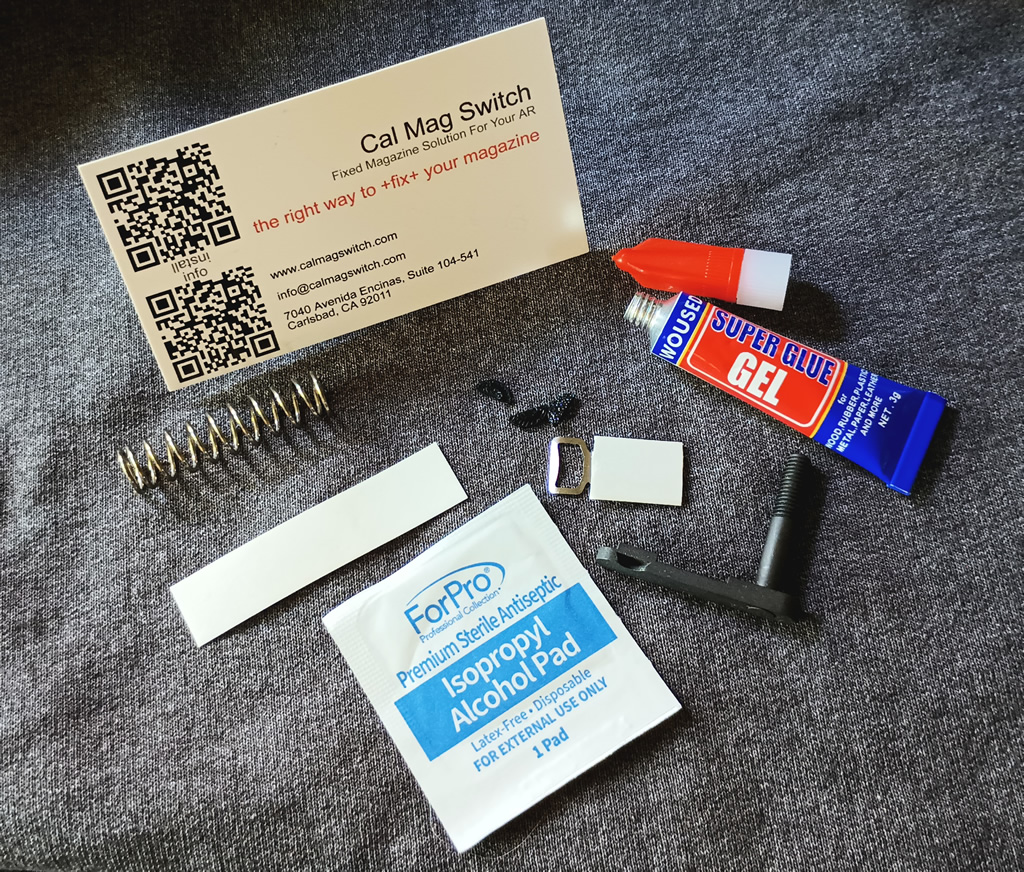
The kit comes with almost everything you need to install the Cal Mag Fix device. Included are the modified magazine catch, the key assembly, an alcohol cleaning pad, a spring to hold the device while the adhesive tape cures and extra tape, should you need it. The only items not included are a razor blade or needle, but almost anything sharp and/or pointy will do, a pair of needle nose pliers and some masking tape.
A tube of cyanoacrylate gel adhesive is also included for those that want to do a fully permanent install. Though the adhesive tape provided is rated as a ‘permanent adhesive’, once comfortable with the device, we recommend that you proceed with a permanent, glued-in install as described below. It should be noted that customers in certain states must install this device using the glued-in installation procedure.
It should be noted that this device must be installed in temperatures over 50°F, and it is better to be in the 70 to 80°F range. However, once installed, the adhesive is rated for service at much lower temperatures than this.
Step 1
Remove the upper receiver, magazine and magazine catch from the lower receiver.
Clean the recess on the inside of the magazine well with the alcohol cleaning pad provided. It is critical that this surface be completely clean and free of oil or other contaminates. If you have not been in the habit of cleaning this area regularly, it would be best to hit it with some gun cleaning solvent before using the provided alcohol pad. If you are typically very free with the oil, it may be best to start with warm soapy water or 100% acetone before finishing with the alcohol cleaning pad.
While in you are in there, it would also be good to clean out the rest of the magazine well, too.
Extra double sided tape is provided in case you make a mistake installing on the first try or two. If you find that the tape is not adhering very well, it is almost always because this area has not been properly cleaned. If you do try again with a new piece of tape from the strip provided, make sure that the mounting area is spotless and oil free and that all the old tape residue is removed from both the magazine well and the device.

Step 2
Install the new magazine catch.
Once installed, press the magazine release button hard, almost like you are going to remove the magazine catch, but don’t remove it. Instead, slip the corner of the cleaning pad wrapper, folded over if it will fit, in between the bottom of the magazine catch and the slot for it on the lower receiver. Let go of the magazine release button leaving the wrapper in place. At the end of this step, the magazine catch should fully reseat into its recess, but be firmly biased upwards.

Step 3
Push the top of the key on the key assembly down so that the tang indicated extends from the bottom. Then, using a razor blade or needle, carefully remove the film from the adhesive on the key assembly’s sleeve. If the adhesive gets bunched up, use a razor blade or needle to push it back into place.

Step 4
Holding the key assembly at an angle to the magazine well, insert the tang into the relief on the magazine catch. Then, slowly rotate the key assembly against the inside wall of the magazine well while biasing the key assembly down and into the magazine catch. Stop when the key assembly just begins to adhere to the magazine well side wall. Do not press on the device at this stage, even though the video shows the installer pressing on it immediately. The device should fit entirely within the recess in the magazine well and sit flat against it.
Inspect the key assembly to see if the top of its sleeve is below the top on the lower receiver as indicated in the picture. If it is not, carefully rotate the key assembly back a small amount, until the adhesive releases, and then again push it down towards the magazine catch while once again rotating it back to the magazine well side wall.
Once in the key assembly is in its proper place, apply strong pressure to the key assembly for a minute or so to help the adhesive bond to the magazine well.

Step 5
Apply masking tape to the lower as shown. This will help protect the finish on your rifle as well as prevent the device from moving around while the adhesive tape sets up. Be sure to double up the tape covering the newly installed device and to iron it out so it is taut and flat around the device.
Making a mark on the tape in the center of the device may help with the next step.
Step 6
Once taped up, insert the compression spring provided into the magazine well as shown. This will keep constant pressure on the adhesive while it sets up and this greatly increases its bond strength. Be patient and careful, it may take a few attempts. Opening the needle nose pliers wide to grasp as many of the spring’s active coils as you can will help.
Adjust the spring’s location so that it is pressing on the center of the device. Then, adjust the other end of the spring so that it is aligned and concentric with the first end that you centered on the device. When finished, inspect the spring’s location from several angles to verify this alignment.
Step 7
Place two layers of masking tape on the upper receiver as shown in the video. This is to prevent the device from migrating upwards as the adhesive tape cures.
Step 8
Add a long strip of tape loosely around the spring and through the bottom of the magazine well as shown. This tape is used in case the spring gets loose from getting bumped or something. Then, install the taped upper on the lower and set the pivot and takedown pins. A magazine will not fit in the rifle at this stage and you should not attempt to load one.
Step 9
Let the rifle sit undisturbed for 48 to 72 hours taped up and assembled without a magazine, with the spring left in the magazine well. After this, open the action and remove the spring and all the tape.
It is best to inspect the device again as outlined in Step 4 just to be sure.

Step 10
For compliance purposes and in accordance with our Terms and Conditions, the plug needs to be installed on the magazine catch, and one is provided. To do so, the action must be open and upper separated from the lower. The device must then be disengaged from the magazine catch by pulling the tab up.
The plug slips onto the new magazine catch, as shown. Installing it involves pressing the magazine release button so hard that the catch extends outboard enough to slip the plug into the slot on the catch. The plug is held in place by the geometry and doesn’t require any adhesive, although some folks might choose to add some some in the groove of the plug prior to assembly.
Installing this plug does not affect the primary operation of the device. It only affects the availably of the safety feature that allows one to drop a magazine in the case of an emergency, such as a double feed jam.

Troubleshooting
If you have any problems with the install or the device, please review our troubleshooting page to see if that resolves the issue before contacting us. If that is no help, we are very interested in hearing about your issue, not only to help you, but to improve our device.
Device Removal
A device that is mounted using the tape can be removed by slipping the tip of a razor blade in between the magazine well wall and the key assembly. However, this will ruin the adhesive so the device will not be able to remounted without either using a new piece of tape from the strip provided or gluing it in place, as described below.
Permanent Install
While the adhesive tape provided with the device makes a strong bond that meets the needs of the device, we recommend that you glue the device in place with the provided cyanoacrylate gel (super glue) for a truly permanent bond. In certain states, customers must complete this type of install.
To do so, the tape/adhesive on the key assembly must be completely removed. The best way seems to be to start at a corner and use your thumb to push and rollup the adhesive tape. WD-40 or 100% acetone and a cloth can be used to soften the adhesive to aid in this process. Then, using alcohol, thoroughly clean the surface to remove any oils from your fingers. Like with the magazine well, this part needs to be completely free of any oil, contaminates or residue that might interfere with the bond.
The installation procedure listed above mostly applies to this type of install. However, in place of the tape, use 3 tiny drops along each long edge, placed about 1/8 inch in from the edge, with 2 additional drops in the middle as shown in the adjacent picture. Mount it as described above, immediately clean up excess adhesive with alcohol and hold in place for 1 to 2 minutes for the initial bond. Full bond strength takes 24 hours to develop. It does not need to be clamped in placed during this 24 hour period, although the device should not be disturbed or the rifle used during this time.
Attention to detail and being clean and careful is key for getting a good permanent install.
